Check our terms and conditions, privacy policies, and cookies policy.
Copyright 2024 © All rights Reserved. Designed by LACNet
Here you will find instructions for the deployment of nodes on Kubernetes using HELM. This implies that it will be executed from a local machine on a remote server. The local machine and the remote server will communicate via helm. The installation with kubernetes manifests is compatible with Google Kubernetes Engine.
During the process of node deploying, you will be asked about the network in which you would like to deploy your nodes. In order for your node to get permissioned, you need to complete the permissioning process first. In order to understand better what are the types of networks available and the permissioning processes for each network, please read permissioning process.
Recommended hardware features for Besu node:
| Recommended Hardware | On Mainnet-Omega | On Open ProTestnet | On Legacy ProTestnet (DEPRECATED) |
CPU | 4 vCPUs compute optimized | 4 vCPUs compute optimized | 2 vCPUs |
RAM Memory | 16 GB | 16 GB | 8 GB |
Hard Disk | 375 GB SSD | 50 GB SSD | 250 GB SSD |
IOPs | 70,000 IOPS READ 50,000 IOPS WRITE | 70,000 IOPS READ 50,000 IOPS WRITE | 15,000 IOPS READ 5,000 IOPS WRITE |
Kubernetes: Google Kubernestes Engine GKE.
It is necessary to enable the following network ports in the machine in which we are going to deploy the node:
Besu Node:
Nginx:
For this installation we will use Kubectl. It is necessary to install Kubectl on a local machine that will perform the installation of the node on a kubernetes cluster. Following the instructions to install kubectl in your local machine.
For this installation we will use Helm. It is necessary to install helm on a local machine that will perform the installation of the node on a kubernetes cluster. Following the instructions to install helm in your local machine.
To configure and install Besu you must clone this git repository in your local machine.
					$ git clone https://github.com/LACNetNetworks/besu-networks
$ cd besu-networks/helm/
There are three types of nodes (Bootnode / Validator / Writer) that can be created in the LACChain networks orchestrated by LACNet at this moment.
There are three types of values which corresponde to the four types of nodes: bootnode.yml, validator.yml, writer.yml. The values you have to set are in the deploy section. These are the following:
Values:
Note: set Environment variable on values helm at directory /helm/values. type node bootnode file bootnode.yml, validator file validator.yml and write file writer.yml
e.g. set Environment on helm values at file /helm/values/writer.yml.
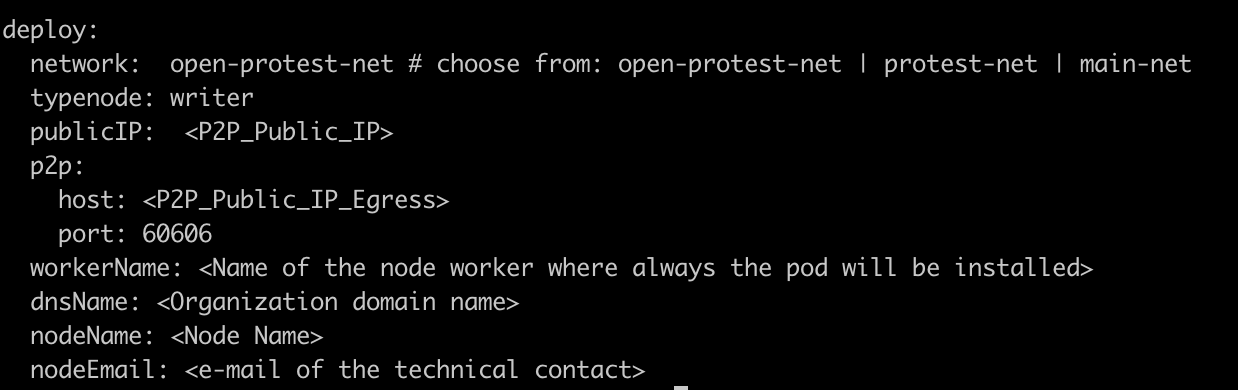
TCP Public IP Ingress: Generate a static public IP in your cloud provider. Then replace the public ip in the load balance (loadBalancerIP) service manifest. finally update the publicIP environment variable with this IP.
P2P Public IP Egress: Outgoing p2p traffic to synchronize besu nodes. This is the permissioned IP for the network. Therefore, the pod must always be installed on the same worker node so that the IP does not change. We obtain the name and IP of the cluster nodes with the following command.
$ kubectl get nodes -o wide
We choose a worker and update the “nodeName” value in the manifest of the pod we are going to deploy. finally update the p2p – host environment variable with worker IP external .
Note: We validate that the pod has been deployed in the selected worker with the following command.
$ kubectl get pod -o wide
Depending type node you want to deploy, you need execute the following command (this deployment is compalitible only Google Kubernestes Engine GKE):
To deploy a Node Writer
$ helm install <chart-name> ./charts/besu-node --namespace <namespace-name> --create-namespace --values ./values/writer.yml
To deploy a Node Bootnode
$ helm install <chart-name> ./charts/besu-node --namespace <namespace-name> --create-namespace --values ./values/bootnode.yml
To deploy a Node Validator
$ helm install <chart-name> ./charts/besu-node --namespace <namespace-name> --create-namespace --values ./values/validator.yml
e.g. deploy Node Writer on Mainnet-Omega network
$ helm install lacnet-writer-1 ./charts/besu-node --namespace lacchain-main-net --create-namespace --values ./values/writer.yml
At the end of the installation, if everything worked a BESU service will be created managed by Systemctl with Running status. Aditional objects created are namespace, service load balancer, configmap, and volume.
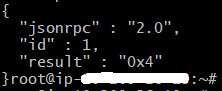
Don’t forget to write down your node’s “enode” :
$ curl -X POST --data '{"jsonrpc":"2.0","method":"net_enode","params":[],"id":1}' http://<PUBLIC_IP>:4545
Result:
"result" : "enode://d837cb6dd3880dec8360edfecf49ea7008e50cf3d889d4f75c0eb7d1033ae1b2fb783ad2021458a369db5d68cf8f25f3fb0080e11db238f4964e273bbc77d1ee@104.197.188.33:60606"
Don’t forget to write down your node’s “enode”. Remember that you need to provide the enode to be permissioned as indicated in the permissioning process. Also as part of the permissioning process, we need you to provide us your node address. Please get it by executing the following:
$ curl -X POST --data '{"jsonrpc":"2.0","method":"eth_coinbase","params":[],"id":53}' http://<PUBLIC_IP>:4545
Result:
{"jsonrpc":"2.0","id":53,"result":"0xa08d3d8f68ba47deb401769e5ed39ff283e60a80"}
The default configuration should work for everyone. However, depending on your needs and technical knowledge you can modify your node’s settings in values folder writer.yml bootnode.yml validator.yml, for RPC access or authentication. Please refer to the reference documentation.
Once you have been permissioned, you can check if your node is connected to the network properly. Check that the node has stablished the connections with the peers:
$ curl -X POST --data '{"jsonrpc":"2.0","method":"net_peerCount","params":[],"id":1}' http://<PUBLIC_IP>:4545
You should get a result like this:
Now you can check if the node is syncing blocks by getting the log:
$ kubectl logs <pod name> -c <container name> -f -n <namespace>
e.g. Node Writer on Mainnet-Omega network
$ kubectl logs besu-node-lacnet-writer-1-0 -c lacnet-writer-1-besu -f -n lacchain-main-net
You should get something like this:

If you need to update the node, try redeploy the besu node: e.g. Node Writer
$ helm upgrade <chart-name> ./charts/besu-node --namespace <namespace-name> --values ./values/writer.yml
If any of these two checks doesn’t work, try to restart the besu service: e.g. Node Writer
					$ kubectl delete pod <pod name> -n <namespace>
$ kubectl delete pod besu-node-lacnet-writer-1-0  -n lacchain-main-net
If that doesn’t solve the problem, open a ticket if you already have a membership or contact us at [email protected].
If you find any issue, you can open an issue on Github and contact us at [email protected]. If you already have a membership, you can also open a ticket.
Now that you have installed your writer node, you can follow our guides to deploy smart contracts, deploy private channels(using Ansible, using Dockers, or using Kubernetes), deploy an IPFS node, and deploy the Hyperledger Firefly stack.
Check our terms and conditions, privacy policies, and cookies policy.
Copyright 2024 © All rights Reserved. Designed by LACNet